

One of the most common mistakes in solar street-light projects is starting with the lamp wattage. A 60 W, 100 W or 150 W fixture does not tell you whether the system will work well at a particular site. The correct design starts with the road, the lighting requirement and the actual operating conditions. Only after those are understood should the LED power, PV size and battery capacity be fixed.
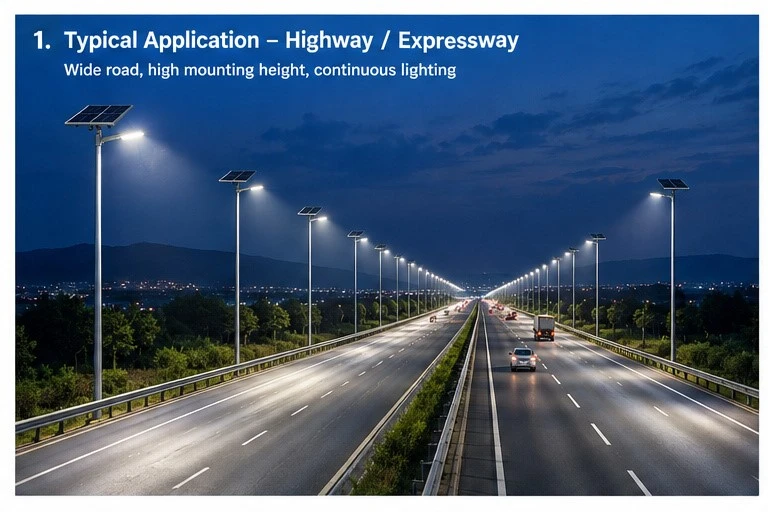
Figure 1. Solar street-light design begins with the application: road geometry, lighting requirement, pole arrangement and operating hours.
That project-first approach is also consistent with recent research. A 2025 study in Cleaner Engineering and Technology proposed a comprehensive solar public-lighting model that considers street width, required illuminance, solar irradiance and luminaire characteristics together, then optimizes pole distribution, mounting height, battery capacity and PV power. The study, validated with an Oman case, specifically argues for a holistic design rather than treating lighting design and renewable-energy sizing as two unrelated calculations.
1. Start with the project, not the solar panel
Before anyone calculates a battery or a photovoltaic panel, the project brief should answer a few basic questions. These are not minor details. They determine the lighting load in the first place.
Where is the road? Country, city, latitude and local climate matter.
- What type of road is it? Highway, urban arterial, secondary road, rural road, parking area, community or pedestrian route?
- How wide is the road and how many lanes are there?
- What is the required pole height, mounting arrangement and approximate pole spacing?
- What lighting standard or project specification applies?
- How many hours must the light operate each night?
- Is full output required all night, or is a dimming profile permitted?
- How many days of autonomy are required when solar generation is poor?
- What is the critical design season, especially the rainy or cloudy season?
2. Road width changes the lighting problem
A highway and a rural road may both use LED solar street lights, but the lighting calculation can be completely different. A wide road may need a higher mounting height, longer spacing, different optics and a different pole arrangement. A narrow rural road may need much less luminous flux and a different distribution.
This is why simply saying 'use a 100 W solar street light' is not a proper engineering design. The same 100 W luminaire can produce very different results depending on optics, mounting height, pole spacing, road width and aiming.
3. Set the lighting class and verify it in DIALux
For road projects using EN 13201 or a national standard derived from it, the designer first identifies the appropriate lighting situation/class. ME classes are primarily luminance-based road-lighting classes; other EN 13201 classes use illuminance criteria. That distinction matters when setting up the calculation in DIALux.
The project specification should therefore be the starting point. DIALux is then used to test the actual road geometry and luminaire photometry: mounting height, pole spacing, road width, number of lanes, arrangement, optics and aiming. The output can then be checked against the required average value, minimum value, uniformity and other applicable criteria.
A useful reference table from European road-lighting documentation shows, for example, the EN 13201 M-series moving from M1 through M5 with different luminance requirements. The exact class must be selected from the project's road and traffic conditions and the applicable national/project standard, rather than chosen from road width alone. cite turn0search47
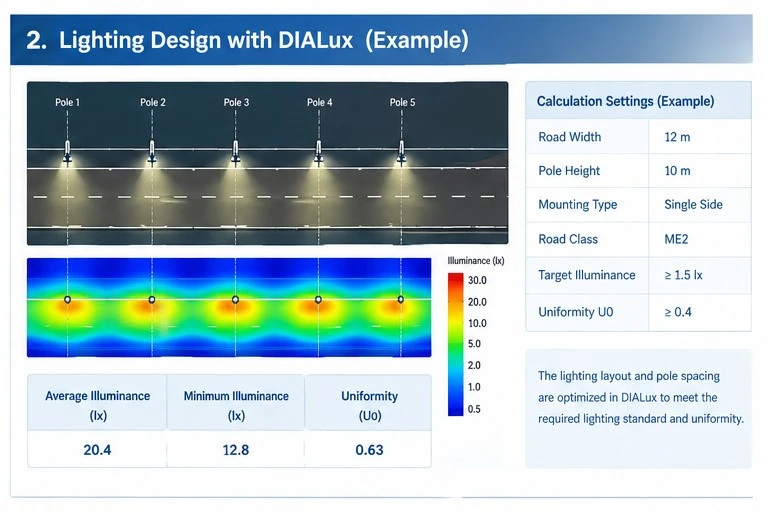
Figure 2. Illustrative DIALux-style workflow: define the road and lighting class, test the layout, then use the resulting luminaire requirement for energy sizing.
4. The DIALux result tells you what the lamp needs to deliver
Once the road model is correct, the lighting simulation answers the next question: how much light is actually required from each pole?
- Luminaire luminous flux and photometric distribution
- Number of luminaires and pole spacing
- Mounting height and arm geometry
- Average and minimum lighting values
- Uniformity
- Potential glare or other project-specific requirements
This is the point where the electrical and solar design begins. The LED wattage is not selected in isolation. It is selected because a particular luminaire, with a particular optic and photometric file, can meet the lighting target at the proposed spacing and height.
5. Convert the lighting requirement into nightly energy consumption
After the lighting layout is fixed, calculate the actual operating profile. If a 100 W luminaire runs at full power for 12 hours, the simple LED energy demand is 1,200 Wh per night. If the controller allows scheduled dimming, the calculation should follow the real profile instead of simply multiplying rated wattage by 12 hours.
For a stepped profile, for example 100 W for 5 hours, 60 W for 4 hours and 30 W for 3 hours:
E_LED = (100 × 5) + (60 × 4) + (30 × 3) = 1,040 Wh/night
Then add the relevant controller, communication or auxiliary consumption and apply realistic system losses. The final design energy is the energy that the battery and PV system actually have to support, not just the nameplate wattage of the LED.
6. Battery sizing: start with autonomy
Battery sizing answers a different question from PV sizing: how much stored energy is needed to keep the light operating when the sun does not provide enough energy?
A practical first-pass equation is:
Battery nominal energy (Wh) ≈ E_daily × N_autonomy ÷ (DoD × η_battery × η_discharge_path)
Where E_daily is the required nightly energy, N_autonomy is the required number of days, DoD is the permitted depth of discharge, and the efficiency terms account for battery and downstream losses. The exact model should follow the battery manufacturer's data and the project specification.
For a 24 V system, the nominal Ah value can then be estimated as:
Battery capacity (Ah) = Battery energy (Wh) ÷ 24 V
Battery temperature, aging, usable capacity, charge/discharge limits and the required end-of-life performance should also be considered. A battery that looks sufficient when new may not provide the same usable energy after years of cycling.
Recent research on off-grid solar street lighting also highlights battery aging and uncertainty in nightly discharge endurance as important reliability issues. A 2026 study in Sustainable Energy Technologies and Assessments treats blackout risk and battery-constrained operation as core design problems rather than edge cases. cite turn1search1
7. PV sizing: the rainy season matters more than the annual average
This is where many solar street-light designs go wrong. Annual average sunshine can look excellent while the system still struggles during the rainy season.
The PV array has to replace the energy consumed at night and recover the battery. A simplified first-pass equation is:
PV power (Wp) ≈ E_daily ÷ (H_design × η_PV/system)
H_design is the design-month effective sun-hours (or peak-sun-hours) at the actual site and array orientation. η_PV/system represents the combined derating and conversion factors used by the project calculation.
The important word is design. For a reliable standalone street light, do not automatically use the annual average. Use a conservative month or season that reflects the period when solar generation is weakest and the lighting demand is still present.
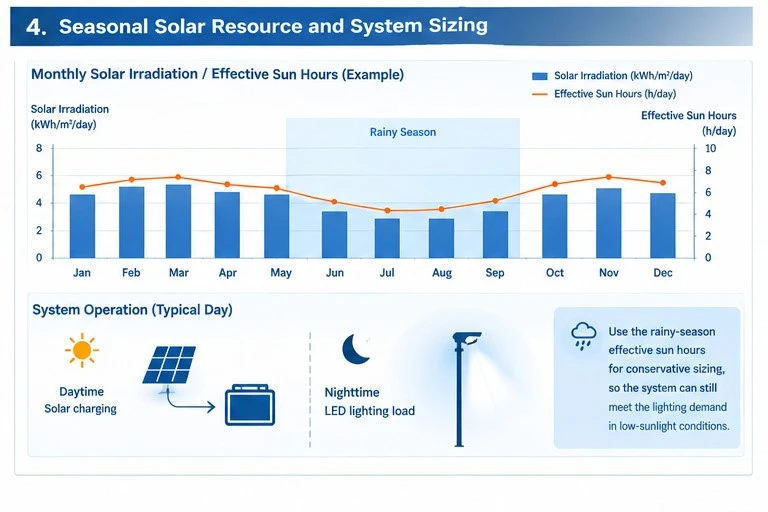
Figure 3. Solar-resource data should be reviewed month by month. The rainy season can become the limiting condition for PV sizing.
PVGIS is a useful independent resource for this step. The European Commission's Joint Research Centre says PVGIS provides solar-radiation and PV-performance data for almost any location worldwide, with monthly, daily and hourly outputs. Its off-grid tools also account for battery capacity and discharge limits. cite turn0search turn0search7
PVGIS also notes that real PV output is affected by irradiance, module temperature, angle of incidence and other losses. In other words, a panel's STC rating is not the same thing as its daily field energy production. cite turn0search2 turn0search4
8. Effective sun hours are not simply 'hours of daylight'
One of the most important terms in a solar calculation is effective sun hours. It is a way of expressing the available solar irradiation as an equivalent number of hours at 1,000 W/m². It is not the same as saying that the sun is visible for that many hours.
This distinction becomes especially important in tropical and monsoon climates. A location may have long daylight hours, but heavy cloud, rain and high humidity can reduce the solar energy reaching the panel. For a project in such a climate, the rainy-season solar resource may control the PV size.
- Use site-specific or reputable satellite/reanalysis solar data.
- Check monthly rather than only annual values.
- Identify the lowest-solar months or rainy season.
- Account for temperature, soiling, orientation, wiring, controller and battery charging losses.
- Check whether the selected PV area is physically possible on the pole and luminaire structure.
9. Real-world example 1: highway project
Consider an illustrative highway project where the client requires a continuous nighttime lighting profile. Suppose the DIALux model, based on the approved road geometry, pole arrangement and photometric file, leads to a 150 W LED luminaire at the selected spacing. Assume 12 hours of operation per night.
Nightly LED energy = 150 W × 12 h = 1,800 Wh/day.
If the project calls for two days of autonomy, the battery must store substantially more than 3.6 kWh nominal because usable capacity, discharge limits and losses must be considered. Likewise, the PV array must generate enough energy during the design solar month to both serve the daily load and recover the battery.
The key point is that the PV and battery are consequences of the lighting requirement. If the highway requires continuous lighting, reducing the lamp output just to fit a small solar panel is not a valid substitute for meeting the lighting requirement unless the project specification explicitly permits dimming.
10. Real-world example 2: urban arterial road
Now consider a city arterial road. The road may be narrower than a highway, but traffic is frequent and the lighting standard can still be demanding. The DIALux model may show that a different optic, mounting height or pole spacing allows a 100 W luminaire to meet the project target.
Example nightly LED energy = 100 W × 12 h = 1,200 Wh/day.
With the same autonomy requirement, this system needs less stored energy than the highway example. But the final PV size still depends heavily on the local design-month solar resource. A 1.2 kWh nightly load in a cloudy coastal city can require a larger PV array than the same load in a much sunnier location.
11. Real-world example 3: rural road
A rural road can have a much lower lighting requirement. Suppose DIALux shows that a 40 W luminaire at the selected pole spacing meets the applicable project requirement, with 11 hours of operation.
Nightly LED energy = 40 W × 11 h = 440 Wh/day.
That is less than one quarter of the highway example's 1.8 kWh/day LED load. The PV and battery can therefore be much smaller, provided the local solar resource and required autonomy support the design.
This is also where motion sensing or scheduled dimming may make engineering sense if the project permits it. The control strategy changes the energy profile, which in turn changes the required battery and PV capacity.
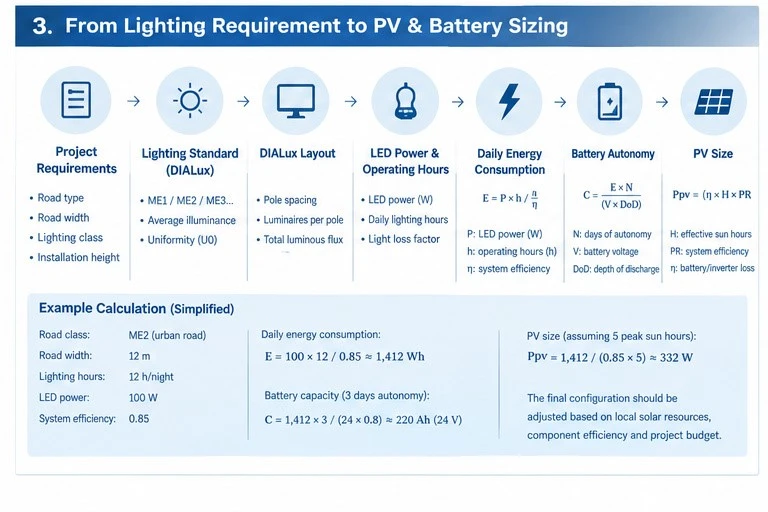
Figure 4. The complete design chain: project requirements → lighting standard → DIALux → luminaire power and operating profile → daily energy → battery autonomy → PV sizing.
12. Why the same lamp can need different solar-panel sizes in different countries
Imagine the same 100 W solar street light installed in two countries. The lighting requirement and operating hours are identical. The battery autonomy is also identical. Yet the recommended PV size may be very different.
The reason is the solar resource. If the design-month effective sun hours are 5 h/day at one location and only 3 h/day during the critical rainy season at another, the second site needs substantially more PV capacity to collect the same daily energy.
Illustrative comparison: 1,200 Wh/day ÷ (5 h × 0.75) ≈ 320 Wp; at 3 h × 0.75, the same load needs ≈ 533 Wp. These numbers are examples only; a real project must use site-specific solar data and the actual system loss model.
This is why quoting one fixed PV-to-lamp wattage ratio for every country is poor engineering. The ratio may work in one location and fail in another.
13. What about rainy days after several cloudy days?
This is where battery autonomy and PV sizing work together. A battery provides the short-term energy reserve; the PV array determines how quickly that reserve can be restored.
- Battery answers: How long can the system keep operating when solar generation is poor?
- PV answers: How much energy can the system recover during the available sunlight?
- Design-month solar data answers: How difficult is the recovery period likely to be?
- Autonomy answers: How much storage is required before the system reaches an unacceptable low state of charge?
For projects in strong rainy-season climates, it is often useful to run a month-by-month energy balance rather than relying on one annual average. A spreadsheet or simulation can track battery state of charge across the year and reveal whether the proposed system recovers after cloudy periods.
14. Suntisolar: product selection should follow the project design
Suntisolar's current solar street-light portfolio includes multiple output ranges and configurations, including the Z88 150 W, Z88 120 W, Z88 100 W, Z58 series, Z66 series and other solar street-light models. citeturn0search0
These product families should be treated as starting points for a project selection, not as fixed packages that are automatically suitable for every road. For a highway, urban arterial or rural road, the correct model and PV/battery configuration should be checked against the approved lighting calculation, operating schedule, local solar resource and autonomy requirement.
That is particularly important for government and infrastructure projects. A technically defensible design can show the chain from the client's lighting requirement to the DIALux result, then from the resulting energy demand to the PV and battery calculation.
15. A practical checklist before finalizing a solar street-light design
- Confirm road classification, width, lanes and traffic conditions.
- Confirm the applicable lighting standard and project-required class.
- Build the actual road geometry in DIALux.
- Use the correct IES/LDT photometric file for the proposed luminaire.
- Verify average/minimum values and uniformity required by the project.
- Confirm the actual LED power and operating schedule.
- Calculate daily energy consumption, including relevant auxiliary loads and losses.
- Set the required autonomy days.
- Select battery chemistry and usable DoD based on the manufacturer's data.
- Check monthly solar irradiation and identify the critical rainy/cloudy season.
- Use design-month effective sun hours for the PV first-pass calculation.
- Run a month-by-month energy/battery balance for important projects.
- Check panel size, weight, wind load and available mounting area.
- Check battery temperature, aging and end-of-life assumptions.
- Only then finalize the product model and quotation.
Conclusion: size the lighting first, then size the solar system
Solar street-light sizing is not really a question of 'How many watts of solar panel do I need for a 100 W lamp?' The better question is: 'What does this project need the light to do, and what solar resource is available at this location?'
The correct sequence is straightforward:
- Define the road and project requirements.
- Select the applicable lighting standard/class.
- Use DIALux to determine the required photometric performance and layout.
- Determine the actual LED power and nighttime operating profile.
- Calculate daily energy consumption.
- Size the battery for the required autonomy and usable capacity.
- Check the local solar resource, especially the rainy-season design month.
- Size the PV array to replace the energy under those conditions.
- Run a full energy-balance check before finalizing the system.
When this process is followed, the solar panel and battery are no longer guesses based on a lamp wattage. They become the result of the project itself. That is the approach needed when a solar street-light system is expected to work reliably for years rather than simply look correct on a quotation sheet.
References
1. Rabaza Castillo, O., Pérez-Ocón, F. A., Aznar-Dols, F., & Gómez-Lorente, D. (2025). Development of a comprehensive model for the design of photovoltaic solar public lighting systems in rural and urban areas. Cleaner Engineering and Technology, 27, 101012. DOI: 10.1016/j.clet.2025.101012.
2. Chouikh, S., Elmitwally, N., & Saeed, F. (2026). Energy reliability and feasibility analysis for battery-constrained off-grid solar street lighting: an uncertainty-aware dimming control framework. Sustainable Energy Technologies and Assessments, 93, 105315. DOI: 10.1016/j.seta.2026.105315.
3. Almeida, R. H., Carrêlo, I. B., & Maia Alves, J. (2019). Intelligent Stand Alone Solar Street Light. Research work describing daylight/presence sensing and its effect on system sizing.
4. Joint Research Centre, European Commission. PVGIS 5 User Manual and PVGIS data sources/calculation methods.
5. EN 13201 road lighting framework; project-specific national and authority requirements should be checked before final design.
6. Suntisolar. Solar Street Light product portfolio, including Z88 and Z58/Z66 product families.


